|
Images |


|
|
Images |
|
Overview: A document can display images in many formats, including BMP, JPEG, TIFF, GIF, PSD, SVG, EPS, PDF, etc.
Inserting Images
There are multiple ways to insert an image in XF Designer:
1. Insert image dialog
To insert an image, the Image button located in the Graphics group, under the Insert tab must be selected and the following dialog will be displayed:
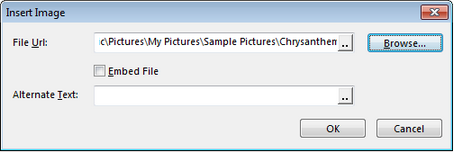
When inserting an image, the image bytes can be embedded in the document. To enable this option, the Embed File button must be selected.
To display a dynamic image, that is, an image supplied as a URL or data in the input XML, the [..] button must be clicked and the Dynamic value from input XML option selected.
By default, all paths will be transformed to relative paths when saving the template. To use absolute paths the Use absolute paths for external references option located in the Options dialog, under the File tab must be selected.
If the image is not available or it was not found at its original path, an user defined Alternate Text can be displayed. This option is available only for PDF and HTML output file formats.
2. Pasting an image from Clipboard
If an image located in another document is copied to Clipboard, XF Designer permits the user to insert the image by simply pasting it in Design View.
This feature is functional only if the image is copied from an opened document and not directly from a folder located in the Operating System.
Editing Images
When a picture is double-clicked, the same dialog as above will be displayed, allowing the user to change the picture's URL.
When a picture is selected in Design View, a contextual Format tab will be displayed in the main ribbon.

Image Properties
The picture can be scaled by dragging its corners after being selected. Even more properties for an image can be accessed by right clicking on the picture and selecting Properties.
Users can also scale the image by changing the Content Height and Content Width properties from the Properties dialog bar. These two fields can be set to a specific length, to auto or scale-to-fit.
If a specific length is used, it is important that not only the length itself is specified, but also the measurement unit (for example 1.5in or 30pt). Percentage values can be used as well.
The orientation of the picture can be: rotated 90, 180 and 270 degrees by selecting it from the appropriate drop-list.
Scaling can be uniform or non-uniform and the scaling method can be automatic (auto), integer-pixels or the user can resample-any-method.
In the contextual menu for an image users also have the ability to select an Absolute Positioning mode. When this option is chosen, XF Designer will place the image in a text box that can be positioned by dragging it's side with the mouse at absolute X/Y coordinates.
For more information, the Properties dialog bar information page is available.