|
Manage Production Tasks |


|
This section of Ecrion Omni System allows you to build the Workflow of your project by selecting available tasks to run in the sequence of your preference. This important feature determines where your data is coming from, what type of document to produce, what to do with it once rendered and much more. A Task is one step in your project Workflow.
Available Tasks
New Task - Allows you to create new tasks for your workflow.
Data Retrieval - These tasks allow you to specify where the data populating your documents will be retrieved from.
Rendering Outputs - These tasks allow you to specify exactly what type of outputs you would like to render and configure other options.
Storage and Distribution - These tasks allow you to specify what is to be done with the files in your project when your workflow is executed.
Action Tasks - Other custom tasks are detailed in this section.
In this section of the help documentation, you can learn about how to use the Manage Production Tasks page, but also about each available option for setting up your workflow.

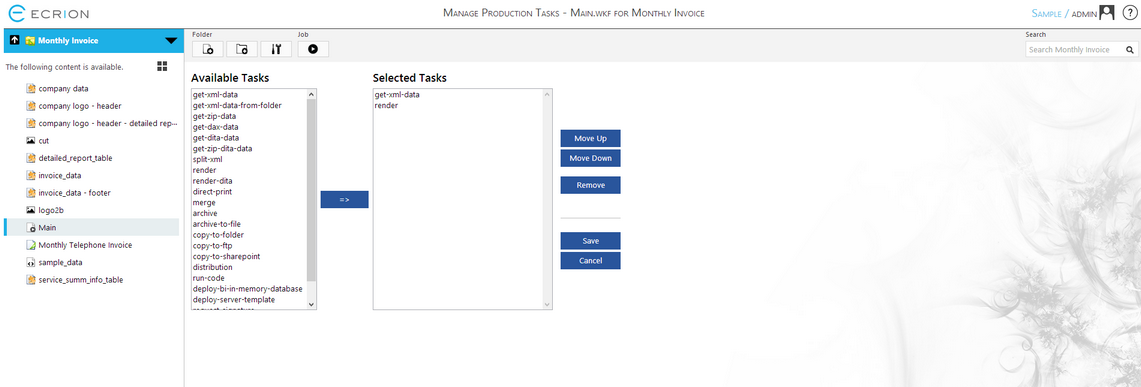
Figure 1: Tasks are selected and configured in the Manage Production Tasks page.
Accessing the Manage Production Tasks Page
You create many Workflows for a single project. To access your current Workflows or create a new Workflow, you will need to select the Settings button located in the Toolbar. In the Folder Properties page you will notice an available section called "Document Production Tasks". In this section, you can access and create your Workflows.
If you currently have a Workflow that you would like to edit, simply select that Workflow to launch the Manage Production Tasks Page. Additionally, you can select New Tasks File to create a new Workflow.

Figure 2: Options related to Workflows can be found in the Project Properties page.
Using the Manage Production Tasks Page
In order to successfully set up your Workflow, you will need to select the desired task in the Available Tasks Menu. Once highlighted, you select the Transfer Button to add this task to your workflow. You will now notice that the selected Task is shown in the Selected Tasks Menu. You now have the following options available to you.
| • | Configure the Task - Select the task in the Selected Tasks Menu to access additional configurations related to that Task. |
| • | Move Up - Used to move tasks up in the specified order. |
| • | Move Down - Used to move tasks down in the specified order. |
| • | Remove - Used to remove the highlighted task from the Selected Tasks Menu. |
When you have finished setting up your workflow Tasks, select Save.
Configuring a Task
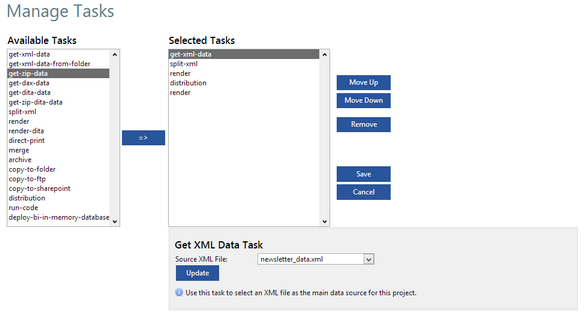
When you select a Task in the Selected Tasks Menu, you will notice that additional configurations are needed. You can learn more about the available tasks and their configuration needs below. Once you specify any options related to a selected Task, you must select Update in order for this to be added to your workflow.
The example in Figure 3 highlights how this is accomplished. You will need to select the Task, modify the available options to meet your needs, and then select Update.

Figure 3: Task menu.