|
Configuring Review and Approval Workflows |


|
A Review and Approval Workflow is a series of steps that you design to guide the review and approval process for any project Package. This valuable tool allows you to specify a system such that when any edit is made to a project file, a Package will be created and a user can initiate your configured Review and Approval Workflow. Ecrion Omni System will then notify each user you've specified in each step, passing valuable information to them about what they need to review.
You will need to read more about how these are initiated in the Working With Packages section of the documentation, but this section is designed to help you use the Review and Approval Workflow Module to design the processes that will guide all of your projects through important steps of review before they reach production.
To begin, select Review and Approval in the Module Selection Menu in the Side Menu. Here you will notice any previously initiated workflows that you can access. In addition, you will need to access the Settings Button located in the Toolbar.

Figure 1: The Review and Approval Module menu.
Once you select the Settings Button, you will navigate the Review and Approval Workflows Page where you can create a new workflow or modify an existing workflow. To modify an existing workflow, simply select that workflow present in the Details Window. You can create a new workflow by selecting the New Workflow button located in the Toolbar.

Figure 2: The New Workflow button is present in the toolbar and existing workflows listed.
Creating Review and Approval Workflows
To set up a Review and Approval Workflow to later be assigned to any of your projects, simply begin by selecting the New Workflow button in the Toolbar, and follow the steps highlighted below.
| • | Name Your New Workflow - Give your workflow an appropriate name. |
| • | Provide a Description - You can optionally, provide a description of this workflow you are designing. |
| • | Select Create Workflow. |

Figure 2: Enter the name of the workflow and a description.
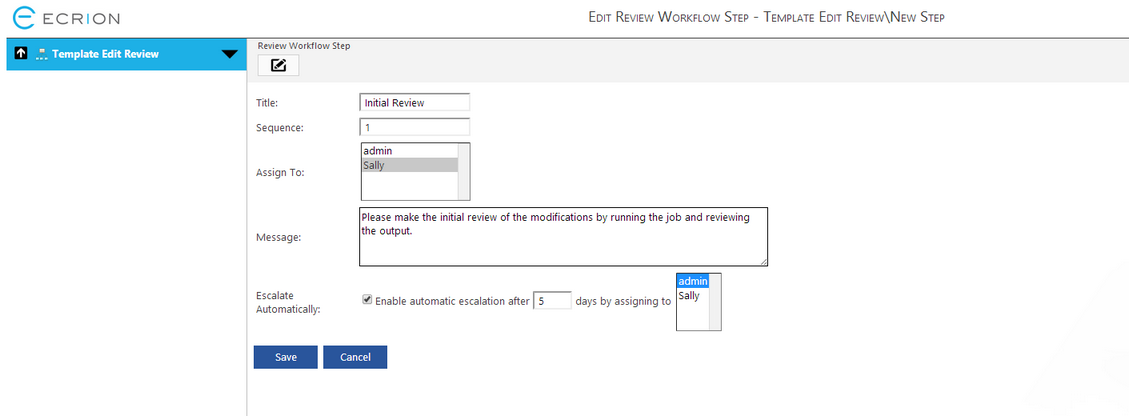
| • | Add a Step - to add a new step, select the New Step Button located in the Toolbar. |
Title - Give your step an appropriate title.
Sequence - This sequence will be used to determine what step this is in your overall workflow.
Assign To - You will need to specify the target user you have already set up in Ecrion Omni System to be notified when this step is initiated.
Message - Add the appropriate information that the target user will need to see when they are notified that the project Package is waiting for their review.
Escalate Automatically - Here you can enable automatic escalation if the review is not approved or rejected after a specified amount of time. The specified user will be notified if this time expires.

Figure 3: A new step in the workflow is added.
You will need to continue this processing of adding steps until you've designed the process for which your project Package will pass through multiple users who will choose to approve of edits or reject to start the process over. Figure 3 demonstrates a sample second step in this example.
Editing Your Review and Approval Workflow
At any point you can access these created steps for modifications such as changing users, modifying the sequence, and more. In the Review and Approval Module page, select the workflow you would like to edit. Next, simply select the step you would like to edit and you will be given access to the Edit Review Workflow Step. Here you can modify any settings just as you did when creating. Figure 4 shows the summary page for all of your configured steps.

Figure 4: Select any step to edit the settings.
Assigning Your Review and Approval Workflow
You can assign your designed Review and Approval Workflows in the Settings menu of the Project Details section for your chosen project. In the Project Settings section you will see an option to Change or Manage Workflows. You can learn more about this option in the Configuring Project Settings section of the help documentation.

Figure 5: Assign the workflow in the Project Settings section of a project.