|
Completing a Project Run |


|
One very important piece of functionality you will need to learn about is how to Run a Job. Whether you are setting up your Project to run on a schedule or calling Ecrion Omni System programmatically to execute your Workflow, you will still need to know how to test the behavior of your Project Workflow once executed.
Once you have added your project files and set up the tasks used to run your project, you can perform a test to see if your project is producing and distributing your outputs as you desire. In all three Project Views (Files, Packages, and Jobs) you will notice in the Toolbar an icon with an arrow inside a circle with the text Job present above. This is the Run Job button and you can always select this option to run a job manually and test the behavior of your Project Workflow.
A project run will use your specified Workflow settings to obtain the input data source, render your documents, and complete post processing actions as specified in the Manage Production Tasks page.
Figure 1: The Run Job button displayed in the Files View. |
Figure 2: The Run Job button displayed in the Packages View. |
Figure 3: The Run Job button displayed in the Jobs View. |
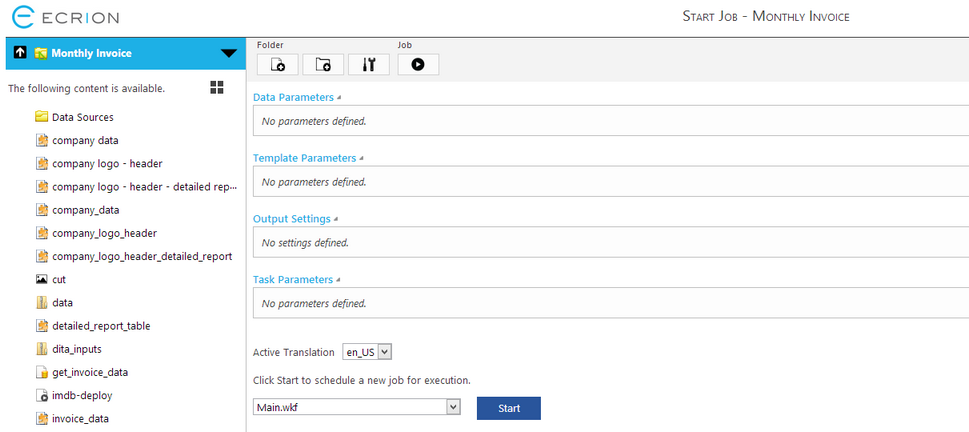
By selecting the Run Job button, you will navigate to the Start Job page where you can specify specific job parameters as well as choose from all available Workflows you have set up for your Project.

Figure 4: The Start Job page allows simple configuration of job parameters and Workflow selection.
Usage
It is important to remember that the Start Job page is dynamic in nature depending upon the configurations you have specific in your Project Workflow. In Figure 4, there are no specific parameters defined for output settings, template, data, or specific tasks that Ecrion Omni System can identify. However, if you define a template parameter, for example, in your render task, then you will have the option to configure this for testing directly in this page. Before you select Start, you will want to fill in all necessary parameters, if applicable, and ensure you are executing your desired Workflow.
Selecting a Workflow
Remember, you can always create many Workflows for your Projects. Because of this, you will first need to select which Workflow you are looking to use for your Job Run. Why is this important you do this first? Not only is it important that you are testing the Workflow that contains the correct tasks you wish to execute, however, the parameters and translation (if applicable) are all directly related to the selected Workflow.
Your first objective is to use the drop down menu by selecting the right arrow to the right of the selection field. If you have only configured one Workflow, then you should only have one task file to choose from. Simply select your desired Workflow and proceed with configuring any parameters if applicable.
Working With Parameters
Let's take a common example of parameter usage in a Workflow by investigating a template parameter. Often when designing templates, you may wish to include a parameter that Ecrion Omni System can overwrite at run time. Imagine a scenario like an account number that will be passed to the template and ultimately filtering down the display of data in the XML to only information relevant to that account number. Your first step will always be, of course, to make sure you design your template to accept such a parameter. For this example, we'll assume the template was designed with a configured parameter called "account_number".
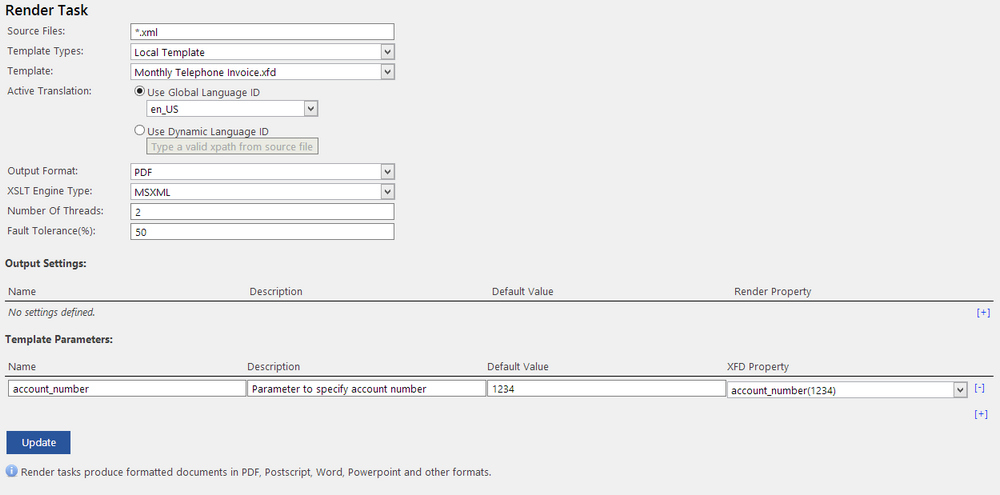
| • | Configuration in Render Task: You must first set up this parameter in the render task. Because we have set up our template with this parameter, we should now be able to find this as an available parameter when configuring the Render Task. By using the drop down menu, we can select this parameter for account number. |

Figure 5: The account number parameter is configured in the Render Task.
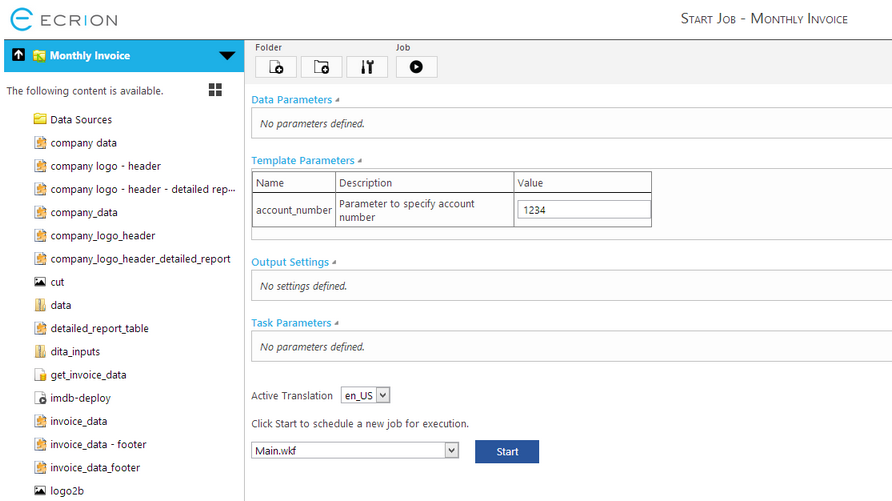
| • | Configuration in the Start Job Page: Now, let's have a look at that Start Job Page with a previously configured parameter. After selecting the Workflow that we configured this Template Parameter for, we will now notice that this parameter is accessible directly in this page, and furthermore, we can modify the value to test a specific output behavior (such as changing the account number to see if, indeed, that account number information is displayed in the resulting invoice). |

Figure 6: A Template Parameter is available for adjustment in the Start Job Page.
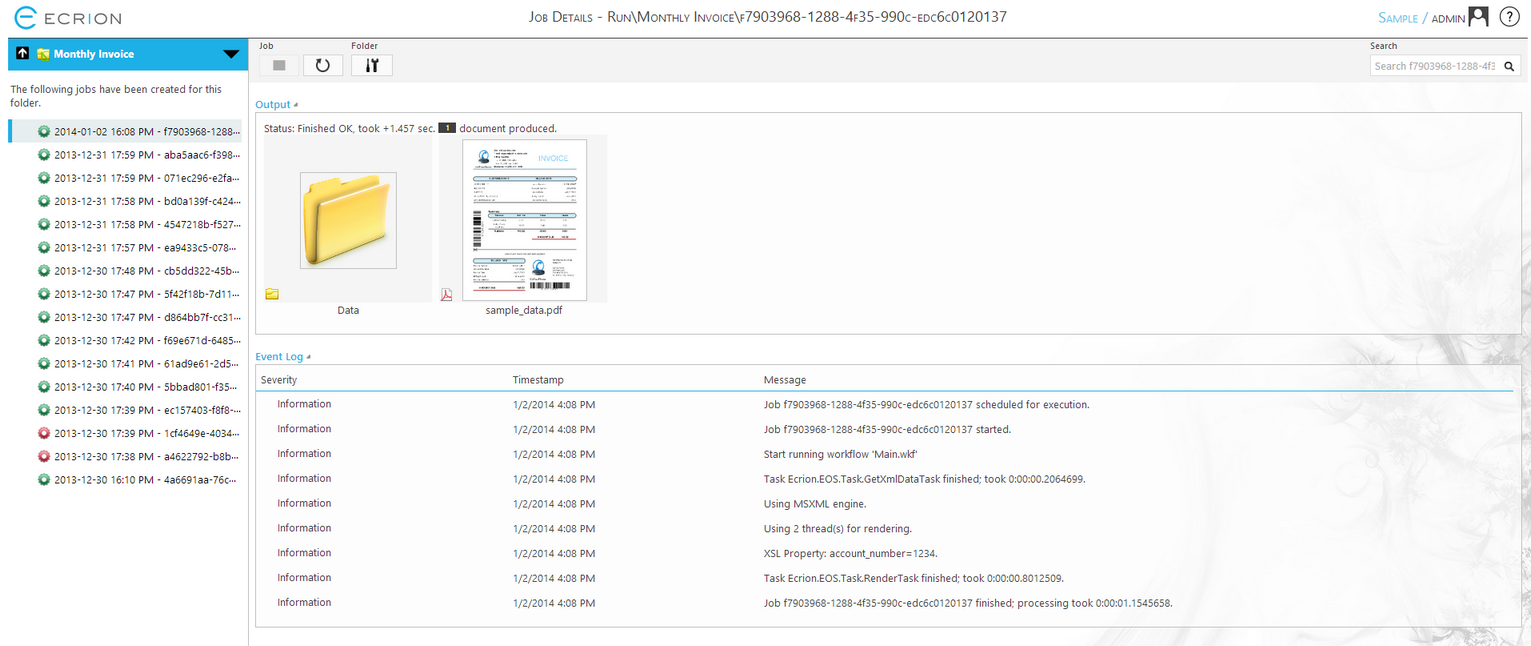
When you are finished making the above specifications, select Start to run the Job. Ecrion Omni System will then display the Project Details page where you will have access to the results and logging information for your Job. To learn more about the Job Details page, visit the help section on Working With Jobs.

Figure 7: The Job Details page allows access to job results and logging information.