|
How to Create a Subdocument |


|
|
How to Create a Subdocument |
|
In the Publisher you will be able to create a subdocument from the Properties Pane. The steps below highlight the best practices for creating a Subdocument.
1. Select the section that you would like to turn into a Subdocument. i.e. Repeating or Conditional Section, Repeating or Conditional Text, or a table
2. Navigate to the corresponding Contextual Tab in the Ribbon.
3. From the Contextual Tab select the Create Subdocument button.
4. Next, the resulting dialog, you will need to use the Browse button to select the location where you would like to save your Subdocument as well as give the Subdocument an identifying name.
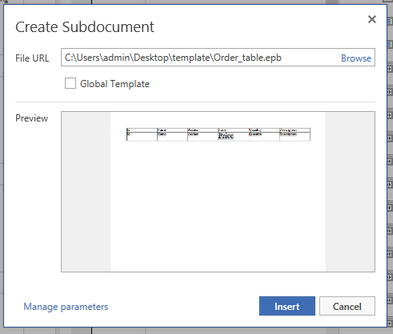
Figure1 : The path and name are given to the Subdocument.
5. You will also notice that you have options to Manage Parameter as well as a check box option for Global Template specification. You can read more about each of these options in the Using Parameters in Subdocuments and Global Templates sections of the documentation. These are not required options and for most Subdocuments these may not apply.
6. Select Save when complete with setup. You will now be returned to the Design Surface. You will notice that now your content has been preserved as the Subdocument.
7. You will now need to add the content you would like to the Subdocument. Visit the Subdocument Options section to learn more about editing, resizing the image, and more.