|
Barcode Properties |


|
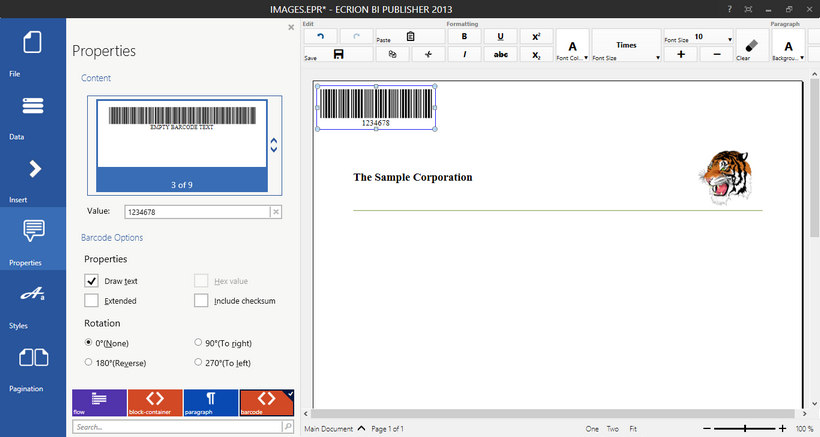
After inserting a Barcode into your Document Template, you may wish to make some adjustments such as changing the Value or perhaps even the Orientation. To do so, you can easily access the Properties associated with your barcode using the Properties Dialog.

Figure 1: The Properties dialog is used to adjust the selected barcode in the Design Surface.
Usage
You will need to begin by first selecting the Barcode in the Design Surface. Then select Properties from the Side Menu to display the Properties Dialog for your Barcode. You should notice the available options for your modification are displayed accordingly. You can review these available options below to assist you with modifying your Barcode.

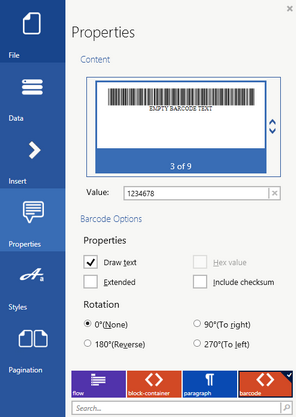
Figure 2: Specific Properties for a barcode are found in the Properties Dialog.
You will notice that the Barcode Element is selected in the Navigation Bar. This must be selected in order to display the necessary properties available for your Barcode. Below you can find helpful information on each of these Barcode Options.
Content
You can change the type of barcode that you would like to use at any point by simply using the up and down arrows to the right of the Preview Image. Once you have chosen the type you would like to use, you will need to now select the actual preview image to apply this change in the Design Surface. This allows you to scroll through the options and only apply this modification when you are ready.
You can also choose to change the Value by adding manual text in the Value Field. As you can see in Figure 2 above, the Value is set to the static value of "1234678".
Barcode Options
The Properties options are targeted on options that are available for the customization of the Value. These Property options are highlighted below for your usage.
| • | Draw Text - Display the value of the barcode. This is useful when you want the Value to be visible to your readers. |
| • | Extended - For some barcode types, you can select this option to extend the set of acceptable Valid Values. If this option is available, you can select the box accordingly. |
| • | Include Checksum - A checksum is used to ensure the preceding information in the barcode value is acceptable. A target machine will compare the checksum to the interpreted value indicators for accuracy. |
You can change the Rotation of the Barcode by simply selecting from one of four available rotation options. You will notice that when you make such a selection in the Properties Dialog the Barcode will be rotated accordingly in the Design Surface.
Borders
You may want to add borders to your barcode to distinguish the barcode from the rest of the content. Here you can use the Borders selection menu to choose the border of your choice and apply accordingly.
Advanced
In this section of the Properties Dialog you can make your Barcode dynamic by retrieving the Values from your data source. Here you can view previously set up Dynamic Properties or specify new Dynamic Properties as you see fit by selecting Edit. Please note that this option will open the Dynamic Properties dialog. Here you can specify properties to be determined directly from your data source or even conditionally specify properties.
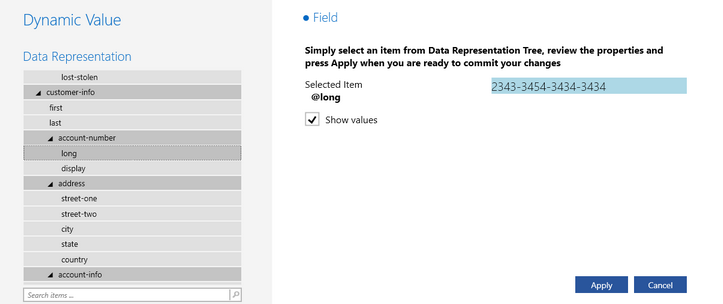
For the usage of Dynamic Properties for a barcode, you will need to follow the instructions in the Dynamic Properties help section to select Value as a Dynamic Property and then find the field in your data to obtain this Value from. Notice in the images below the two steps you will use to specify first the value and then selecting your data source. You can select Apply throughout this process to complete the dynamic value configuration and return to the Barcode Properties.
|
Figure 3: Value is selected in the Dynamic Properties Screen.

Figure 4: The field to obtain the data from is specified in the Dynamic Value Screen.
When you are satisfied with all of your Barcode Property adjustments, you can simply select Properties in the Side Menu to collapse the Properties dialog bar.