|
Borders |


|
|
Borders |
|
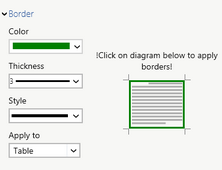
You may need to apply Borders to objects in your Document Template. You will often find the option to apply borders when inserting elements and also when you are working in the Properties Dialog of an object. This section is designed to describe how the borders menu works and how you can use it to add borders to objects in your Document Template.
Figure 1: The borders menu shows available border options.
Usage
To add Borders to an object, you will first need to select the color to be used from the color selection menu. You will notice your selected color will be displayed in this field.
You will then need to select the Thickness you would like to use for your borders. Select from the available choices in the drop down menu.
Now, select the Style of border you would like to use. Again, select the style from the available choices in the drop down menu.
Now that you have made your choices for your borders, you can apply them to the target regions by simply clicking on the preview diagram at the right. As you can see in the example below, the borders have been applied to top, bottom, left, and right areas of the target object.