|
Working With Stylesheets |


|
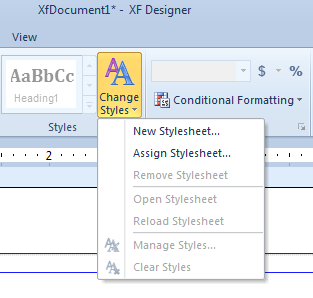
All features related to styles are available in the Styles group located under Home tab.
Creating a new stylesheet
XF Designer can create new .css files from scratch. To create a new .css file, the Change Style button located in the Styles group under the Home tab must be accessed.
There, the New Stylesheet button must be selected and the New Stylesheet dialog will be displayed. After entering a name and a location for the stylesheet, the OK button must be selected and the Manage Styles dialog will open, where the user will be able to perform actions like creating, modifying or removing styles from the .css file.
Assigning an existing stylesheet
To assign a stylesheet (.css file) to the document, the Change Style button located in the Styles group under the Home tab must be accessed.
There, the Assign Stylesheet button must be selected and the Change Stylesheet dialog will be displayed.
After assigning a stylesheet to the document, the other options from the list will be enabled.

Removing the currently assigned stylesheet
To remove a reference to a stylesheet from the document, the Remove Stylesheet option accessed through the Change Style button located in the Styles group under the Home tab must be selected.
Opening the assigned stylesheet
To open a stylesheet, the Open Stylesheet option accessed through the Change Style button located in the Styles group under the Home tab must be selected.
This option will open the .css file in a new XF Designer document.
Reloading the stylesheet
If changes are made in the .css file it must be reloaded it in order to use the new features.
Reload Stylesheet option accessed through the Change Style button located in the Styles group under the Home tab must be selected.
Clearing styles
To clear the style applied to the document the Remove Stylesheet option accessed through the Change Style button located in the Styles group under the Home tab must be selected.