|
Tables |


|
|
Tables |
|
Overview: Tables are objects that can be added to the document to help organize text and other content on a page. Tables help structuring the information for quick access and a better understanding of the illustrated data.
Tables can be used for displaying text and data, creating simple and professional forms that other users can electronically complete or organizing the elements on a page for complex documents like presentations and reports.
Accessing: There are two options for inserting a table:
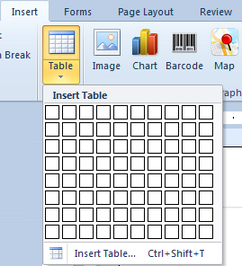
| • | selecting the Table button located in the Table group under the Insert tab. The user can either click on the button to display the Insert Table dialog or select the drop down button for a quick table insertion. |
| • | pressing CTRL+SHIFT+T |
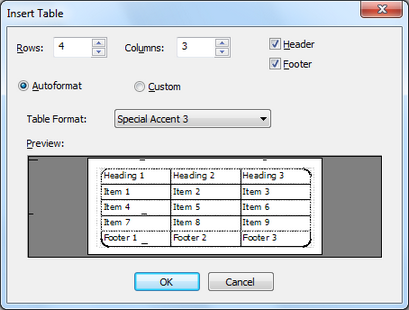
In the Insert Table dialog the user can set the number of columns and rows for the table and different settings to personalize it.
A predefined design is available for selection from the Table Format drop down list when the Autoformat option is enabled.
Borders (Width, Style, Color) and Cells (Padding, Vertical and Horizontal Align) are enabled for customization once the Custom radio button is selected.
After selecting the OK button, the table is inserted in the document at the current position of the cursor.
Tables have a feature named gridlines, which enables the user to see the lines that form the table's structure. Seeing the table's structure can save the user time and make it easier to edit and format it.
To enable the gridlines option, the View Gridlines button located in the Table group, under the Layout context tool tab must be selected.
Note:
| • | gridlines are not visible when printing the document |
Navigation in table is just as easy. The user can click in any cell. If the user prefers using the keyboard, the TAB key can be used for moving forward one cell at a time and SHIFT+TAB to move backwards one cell at a time. Also the arrow keys can be used to navigate in the table.
To add text in a table the user must simply click on the desired cell and type in the respective text.
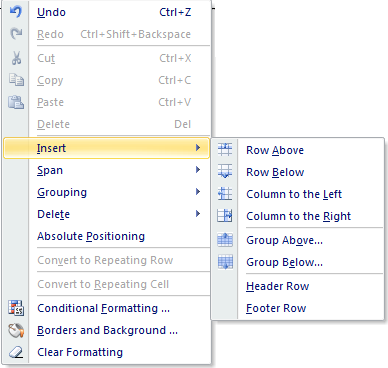
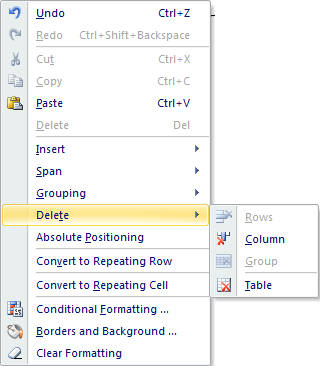
Right-clicking on any table cell/row will enable a quick menu, allowing the user to: Undo, Redo, Cut, Copy, Paste, Delete, Insert, Span, Grouping, Convert to Repeating Row, Convert to Repeating Cell, Absolute Positioning, Properties, Clear Formatting, Conditional Formatting.

The Insert option allows the user to insert a row above/below, a column to the right/left, group above/below or to add a header/footer row if the table does not already have one.
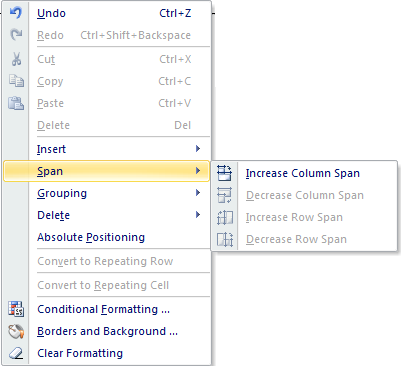
The Span option allows the user to increase or decrease the row/column span.
The Grouping option allows the user to group the dynamic data inserted in table after a user defined path and condition.
An example on how to use the grouping option can be found under the How To... section.

A column, row, group or even the entire table can be deleted using the Delete option. The row/column deleted will be the one where the cursor is placed.
The Absolute Positioning option offers the possibility to set the exact place where the table will be displayed on page. The table can be dragged and dropped in Design View.
Convert to Repeating Row/Cell options can be used for converting a static row/column to a row/column that is repeated after a user defined XPath.
Tables can be transparent, colored and can have background images. To set these properties or any other available property, the user must right-click on the table and select the Properties option.
The Properties dialog bar will displayed, where different attributes can be set for rows, cell or even the entire table.
A table can be inserted into another table and each-one's properties can be handled individually.
A picture or a graphic object can be inserted into a table cell just like inserting it in the document's body.
When pressing the Enter button while the cursor is placed in the first table cell, the table will be moved a line further into the document's body and in the initial line an empty block will be inserted.
When pressing the Enter button while the cursor is placed in the last table cell, the cursor will exit the table and insert a new line below the table.
When pressing the Tab key while the cursor is placed in a row's last cell, a new row will be inserted below.
Note:
| • | The user can create tables with no restriction regarding the number of rows and columns, but the Insert Table dialog restricts the initial table to a maximum of 20 rows and columns. To insert more rows/columns the user can access the Insert > Row Above/Below or Column to the Left/Right from the quick menu available when right clicking in the table. |
More information about the contextual tab tools can be found at the following location: Table Tools
Examples on how to change table row's background and use grouping dynamic data in tables can be found under the How To... section.