|
Table |


|
|
Table |
|
Tables are commonly used elements when designing Document Templates. They are useful for structuring content on your page, displaying static information in a column format, and providing an organized way of displaying large amounts of repeating data from your data source. Data such as transaction lists, product information, and scheduling information are all good examples of where a table might be used to dynamically display data.
You can use Tables in your design to have easier access to targeted formatting per table cell and to control data as it extends over multiple pages. This section is designed to provide you with all the information you need to insert, format, and modify your Tables.
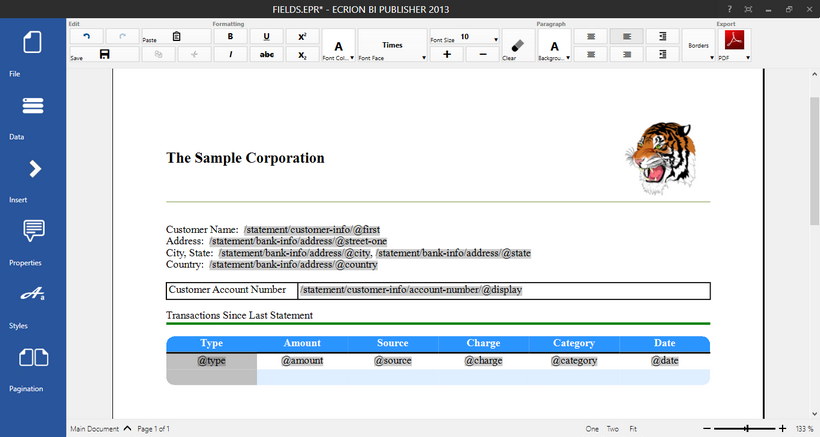
Figure 1: Tables are used to structure customer information and display repeating content.
Usage
To insert a Table in your Document Template you will first need to select Insert in the Side Menu to open the Insert Dialog. You will then have the opportunity to begin configuring your Table. The steps below highlight the options that are available to you.
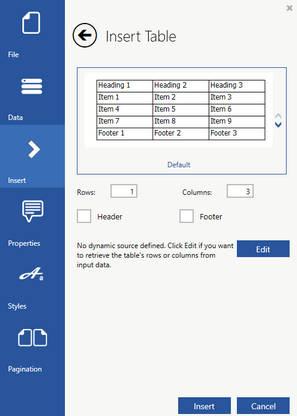
Figure 2: The Insert Table dialog provides table configuration options.
Selecting a Format
The first step is to select a format from the provided options. There are number of choices of provided formats including a clear formatting option for using a table that will not be visible in your output document. You can select a previous design, or simply leave the default format and apply your table formatting by using the Table Properties dialog.
You can toggle through the available table formats by using the up and down arrows located to the right of the preview image.
Rows and Columns
If you are inserting a static Table, you will need to specify the number of both rows and columns you would like in your Table. You will need to manually enter in the numerical value you would like for each in the provided fields. You should be aware that if you choose to specify a dynamic source for your table, the number of rows and columns will be determined by the data that is in your data source.
You can choose to add Header and Footer rows to your Table by simply selecting the accordingly check boxes. Header and Footer rows are very useful when using a dynamic source. These types of Tables often may span over multiple pages depending on your data source. Header and Footer rows will be displayed on every page in your document that the table is displayed on.
You can select Insert at any point to add your Table into your Document Template.
Using Dynamic Tables
If you would like your table to be dynamically constructed from your data source, you can select Edit to configure this option. When this is selected, the Dynamic Table Content dialog will now be displayed. Here you can perform the steps below to configure your dynamic table.
You will first want to specify the Rows Source. This is normally a field in your data source that is repeating. When you select a field in this step, the Publisher will create a row for every occurrence of this field in your data source. In the example in Figure 3, if line is selected, this will display a row for every transaction line in the data source.
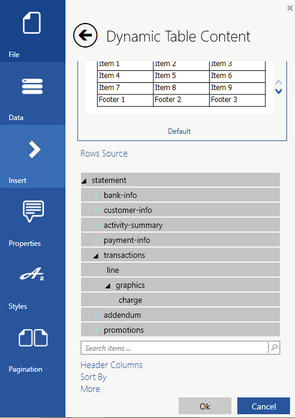
Figure 3: The Dynamic Table Content dialog provides options for configuring a dynamic table.
Once you select the appropriate field, the Publisher will use every attribute associated with that field as a column. You will notice that the Header Columns section will expand to display all possible column options available. You can now choose which of these available options you would like to include in your dynamic Table. In this example, we've chosen not to include background, font, and category columns by simply de-selecting the appropriate box.
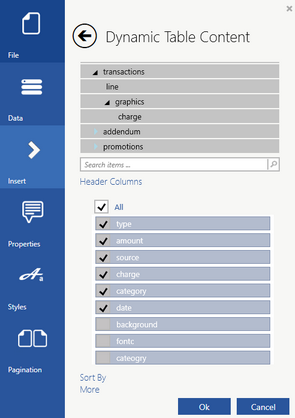
Figure 4: The Header Columns section shows available columns for the selected row source.
If you would like to apply Sorting to your dynamic rows, you can expand the Sort By section to reveal the available attributes that you can sort by. This list be dependent upon the columns that you have chosen in the Header Columns section. In the example below, you can see that we've selected to sort our dynamic table rows on the Amount field. Once a field is selected, you will need to specify the sort order, data type, and case order (if applicable) by selecting from the drop down menus accordingly.
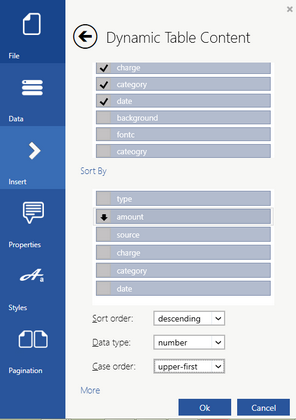
Figure 5: Sorting is applied to the dynamic table rows.
Additionally, you can choose to alternate the table row color by expanding the More section. Here you can check the box to Alternate Row Color and select the row color you would like to specify from the color selection menu.
When you are finished with the setup of Dynamic Table Content, select OK to return to the Insert Table dialog. Lastly, you can select Insert to insert your Table into your Document Template.
When you have successfully inserted your Table, you may want to visit the Properties dialog to modify specific table related properties. To learn more about these Properties, visit the Table Properties section of the help documentation. Additionally, you can make modifications to your table at any point by right clicking in the Table to access the Application Bar. Here you can access many additional options easily, and to read more about this usage, visit the help section on Table Operations.