|
Other Barcode Options |


|
When you insert a barcode into your document template, you will want to know more about options that are available to you at this point. This section will highlight some of your available options to work with your barcode in the Design Surface or accessing properties to modify your barcode.
Properties Tab Options
From the Properties Tab you will have the following options to change after your barcode has been inserted.
Properties
Depending upon the barcode type you inserted, the Properties section will display available Properties that you can check to include or not.
| • | Select Draw Text to include the value along with your barcode in the output. |
| • | Select Extended to have 3 of 9 barcodes accept full ASCII character set. Note: This option is only available for 3 of 9. |
| • | Select Hex Value to specify whether the barcode in hexadecimal for PDF417 barcode type. |
| • | Select Include Checksum to manually specify if you wish to include the checksum or not. |
Rotation
You can choose to rotate your barcode after its inserted into your document template. Simply select the rotation that you would like to apply.
How to Resize Your Barcode
There are two primary ways that you can resize your barcode once you have inserted into your document template.
Using the Design Surface
1. In the Design Surface, select your barcode.
2. Drag and drop any of the selection points to resize your barcode to desired size.
3. Release mouse.
Figure 1: The barcode is selected. |
Figure 2: Drag to resize. |
Figure 3: The resized barcode is displayed. |
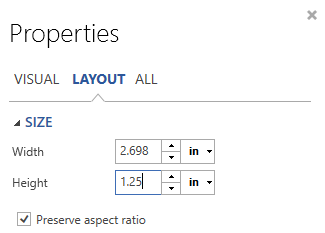
Using the Properties Pane
1. Right click on the barcode in the Design Surface and select Properties from the resulting contextual menu.
2. Select the Layout menu at the top of the pane.
3. Specify your desired unit measurement to the right using the drop down menu.
4. Specify your desired dimensions for Width and Height.

Figure 4: The Properties Pane provides the option to resize the barcode.