|
Barcode Options Explained |


|
|
Barcode Options Explained |
|
Regardless if you are inserting a static or dynamic barcode, you will first need to understand the options available to you when inserting any barcode. In this section of the documentation, you can learn about these options in detail.
Select Your Barcode Type
When first inserting a barcode, you will need to select the type of barcode you wish to insert in the Insert Barcode Dialog.
1. Begin by selecting an option from the drop down menu.
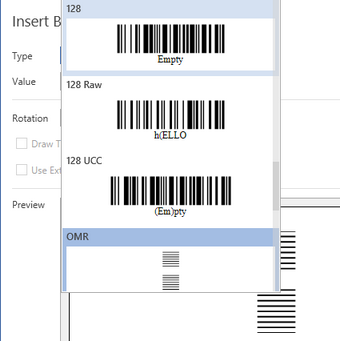
Figure 1: The Barcode Type is selected and information is displayed.
Available Barcodes
The following barcodes are available for you to choose from in the Publisher.
UPC-E, UPC-A, EAN-8, EAN-13, Data Matrix, PDF417, 2 of 5, 3 of 9, Postnet, Planet, 128, 128 Raw, 128 UCC, OMR, Aztec, Maxicode, QR Barcode, and Intelligent Mail.
Specify a Value
If you are only inserting a static value to be used as your barcode, you will simply need to type your value to be used in the Value Field available as shown in Figure 1. You can view an example of using a simple static barcode in the How to Insert a Simple Static Barcode section. In addition, if you are going to make your barcode dynamic, you can leave blank and learn more in the How to Insert a Dynamic Barcode section.
Select Your Barcode Type
When first inserting a barcode, you will need to select the type of barcode you wish to insert in the Insert Barcode Dialog.
1. Begin by selecting an option from the drop down menu.
Figure 2: The Barcode Type is selected and information is displayed.
Available Barcodes
The following barcodes are available for you to choose from in the Publisher.
UPC-E, UPC-A, EAN-8, EAN-13, Data Matrix, PDF417, 2 of 5, 3 of 9, Postnet, Planet, 128, 128 Raw, 128 UCC, OMR, Aztec, Maxicode, QR Barcode, and Intelligent Mail.
Specify a Value
If you are only inserting a static value to be used as your barcode, you will simply need to type your value to be used in the Value Field available. You can view an example of using a simple static barcode in the How to Insert a Simple Static Barcode section. In addition, if you are going to make your barcode dynamic, you can leave blank and learn more in the How to Insert a Dynamic Barcode section.
If you are typing a value to be used in your barcode, you will need to ensure that it qualifies as an acceptable value as specified in the Valid Value description.
Advanced Options
The advanced options that you will have from the Insert Barcode Dialog are to adjust the rotation of the barcode, as well as select from the following options that are available depending on the barcode type selected:
| • | Draw Test |
| • | Use Extended Character Set |
| • | Include checksum |
| • | UTF8 Encoding |
Regardless if you are inserting a static or dynamic barcode, you will first need to understand the options available to you when inserting any barcode. In this section of the documentation, you can learn about these options in detail.