|
Converting a Static Table Row to a Repeating Row |


|
In the event that you have already inserted a static table into your document and you wish to convert one of the rows to a repeating table row, you can follow the instructions provided below to assist you.
We'll begin with a simple example of adding a table with a header row and normal row with three columns. In this example, we will convert this table row into a dynamic row that will repeat for every "Product" element found in our XML data source.
How to Convert the Table Row to a Repeating Row
1. To begin, first place your cursor inside of the table row that you wish to convert to a repeating row.
2. Right click, and you will be presented with a contextual menu. Select the option to Convert To and then choose Repeated Row.
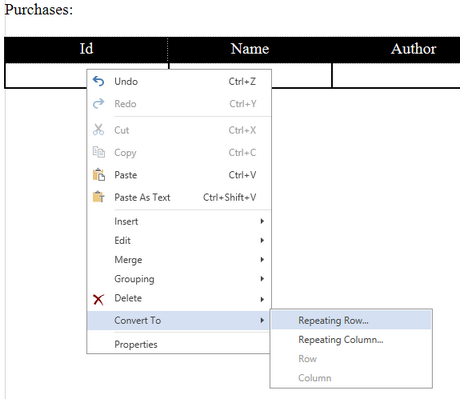
Figure 1: The contextual menu presented on right clicking allows converting to a repeated row.
3. You will now be presented with the Insert Repeating Row Dialog. You can now select in the Data Tree the repeating element in your data source that you wish for the row to repeat for. In our example we will navigate to and select the "Product" element. Notice that the selected item will be highlighted to give you a visual indication of your selection. For more complex expressions, you can select Create Expression to create your own XPath Expression.
4. When you are finished with your configuration, select Save. You will now be returned to the Design Surface where you will notice your table row is now highlighted in green and there will be a visual indication of the element that the row repeats for.

Figure 2: The table row is now indicating visually that it is set to repeat for every "Product" element.
Understanding a Common Error When Converting a Row to a Repeating Row
You will notice in our example we have converted a previously static table row with dynamic content (fields) present previously. A common error that can occur when converting a table row that already has dynamic content in it is that your output will only repeat the same information. As you can see in Figure 3, if we preview the output of our converted table, only one item is displayed.
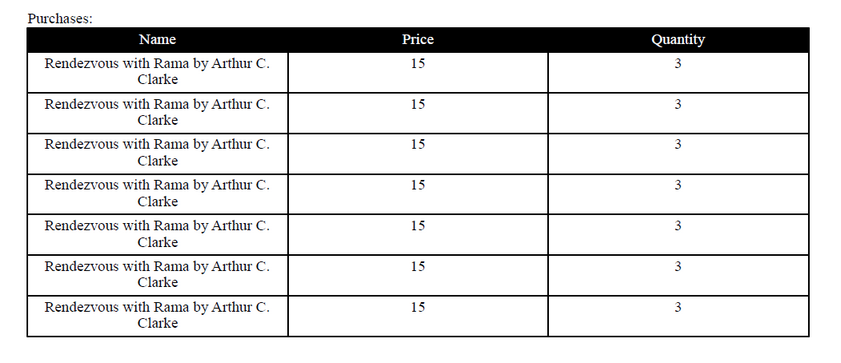
Figure 3: The row repeats but the content does not change.
It is important to understand that when the Field was originally created, it was set up to find a specific value in the data source. However, by converting this row to a repeating row we have now changed the context in which this field is evaluated. What we really want, in this example, is for the Field to pull the content that is relative to the repeated element that is currently being evaluated. For this reason alone, we recommend that you always set your repeating rows before adding any dynamic content to avoid having to make additional modifications. There are primarily two ways that you can resolve such an issue.
Changing the Fields Using the Edit Field Dialog
1. Begin by selecting the Field in the Design Surface.
2. Double click on the Field to launch the Create Expression Dialog.
3. In the Create Expression Dialog, you will notice now that some fields outside of your repeating element are in gray. This is because the repeating context is taken into consideration.
4. In the Create Expression Dialog you will need to update the XPath in the expression box. To do so, simply delete the expression that is there, and select the original field. In our example, the field was originally retrieving the "price" attribute, so we will select the "price" attribute again. This time, the Publisher will automatically take into consideration the new context and update our field appropriately.
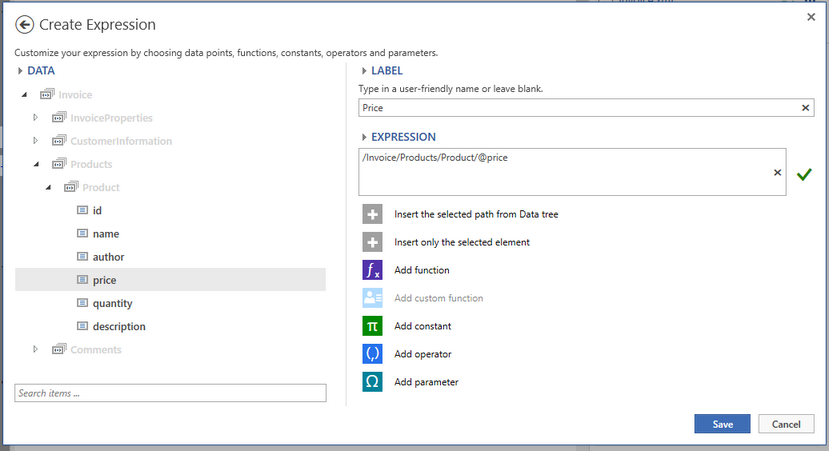
Figure 4: Notice the XPATH expression before we update the field.
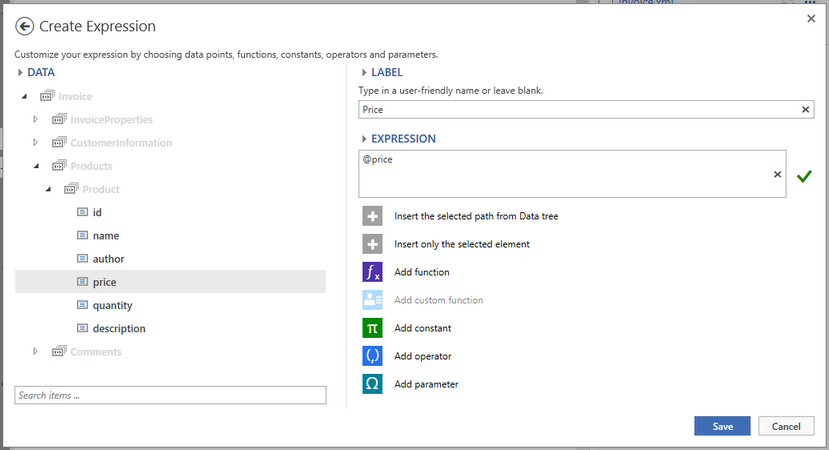
Figure 5: You will see that the context from our repeating row is taken into account when we update the field.
5. Select Save when configurations are complete. Now it is recommended to preview your output to ensure the content is displayed correctly, and this process should be repeated for every Field present in your table row that was converted.
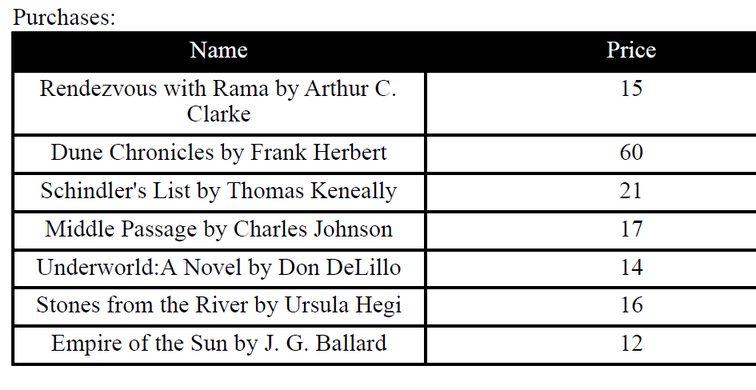
Figure 6: The output reveals the information displayed is relative to the current node being evaluated.
Deleting and Replacing the Fields
Deleting and replacing the Fields in your table row is a valid option if you do not have many to replace or if you have not already applied formatting to your Fields. If you have already spent valuable time applying formatting to your Fields within the table row, you should probably use the method described above to modify the Fields so you will not need to reformat them. However, if you now delete and replace these Fields with new ones, the Publisher will automatically take the repeating context into consideration.
1. Select a Field in your table row and delete.
2. Using the Drag and Drop method, select the same data point previously deleted in the Data Source Pane and drag into the repeating table row to create a new Field.
3. The Publisher will now automatically take the repeating context into consideration and previewing your output should yield results as demonstrated in Figure 8.