|
Creating a New Dashboard with the Wizard |


|
Regardless of which Display Type you choose, the New Dashboard Wizard is designed to guide you, step by step, through the configuration and design of your Dashboard. This helpful tool is useful for new and experienced users alike, ensuring that nothing is left behind in the process of your design.

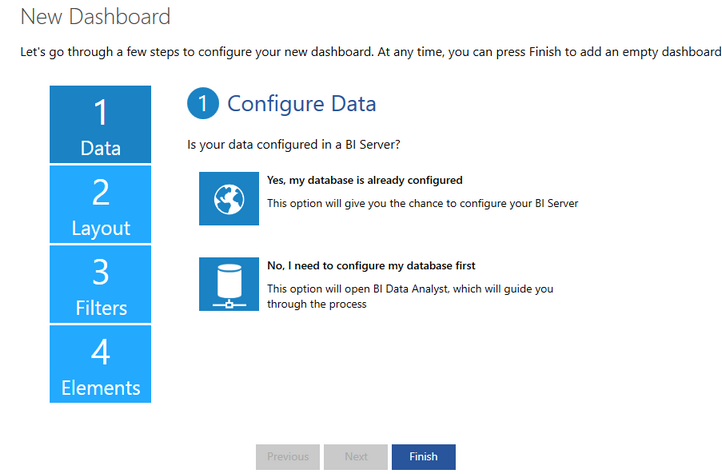
Figure 1: The New Dashboard Wizard begins the four step process.
To use the Wizard, you will simply need to use the Next and Previous buttons to navigate through the four steps of Dashboard design. At any point, by selecting Finish you will exit the Wizard and will begin working independently.
Summary of Steps
The Wizard will guide you through the configuration in four easy steps which are described below. As Figure 1 above displays, your first step will be configuring your data.
1. Configure Data
![]()
In this step you will be guided through the configuration of your data in a BI Server, either by selecting an already configured BI In-Memory Database or by configuring a new one using BI Data Analyst.
Also see: Configuring Data.
2. Configure Layout

Note: These step is not mandatory, you can click Finish at any time, skipping the wizard, and continue editing your dashboard.
In this step you will be able to either choose from a number of preset layouts or no layout and create your own from scratch. Depending on the type of widgets contained by the selected layout, the next two steps will be available or not.
Also see: Choosing a Layout.
3. Configure Filters
![]()
Note: These step is not mandatory, you can click Finish at any time, skipping the wizard, and continue editing your dashboard.
Note: This step will only be available if the layout, chosen in step 2, contains this type of widget.
In this step you will be able to configure the filter widgets contained by the layout previously selected.
Also see: Configuring Filters.
4. Configure Elements

Note: These step is not mandatory, you can click Finish at any time, skipping the wizard, and continue editing your dashboard.
Note: This step will only be available if the layout, chosen in step 2, contains this type of widgets.
In this step you will be able to configure the element widgets (charts, tables, pivot tables, cross tables or text ) contained by the layout previously selected.
Also see: Configuring Widgets.