|
Merge |


|
The merge task is helpful to use when you would like to merge together outputs of type PDF, AFP, or Postscript. Let's take an example where you might be generating 5 different one-page documents as a result of a split-xml task in your workflow. However, if a need arises to send a combined 5 page PDF to be printed, the merge task would be applicable. This will use the XML's and specified template and merge the outputs into a single file.

Figure 1: The merge task is selected in the Selected Tasks window.
Configuration
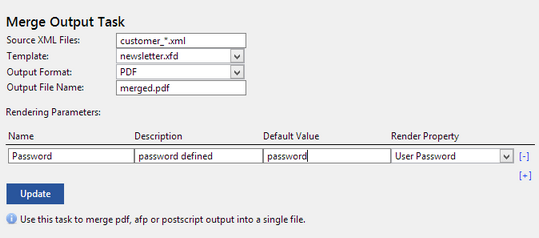
In order to use the merge task, you will need to configure a few different items. Once you have selected the task in the Selected Tasks window, the configuration menu will be displayed below. These items are highlighted below to assist you.

Figure 2: The merge task is configured in the configuration menu.
| • | Source XML Files - First you will need to specify which XML files to use as input. The example in Figure 2 shows how we are taking any XML (following our specified naming structure) that is present in the project run. |
| • | Template - Here you will need to specify which template you have uploaded into your project to be used to render the outputs. The drop down list will be populated by the templates located in your project, and you can simply select the template to be used. |
| • | Output Format - Select your desired output format for the merge. You should be aware that the output formats available are AFP, Postscript, and PDF. |
| • | Output File Name - Specify the name of your output file. This can be static, as shown in Figure 2, or can include dynamic content using {XPATH:/somexpath/...} syntax. |
| • | Rendering Parameters - Additionally, you can specify Rendering Parameters if required. Select the '+' button to the right to add a parameter and specify fields. In Figure 2, we have created a parameter by selecting the User Password Render Property from the drop down menu. Then, values for Name, Description, and Default Value are added. Such parameters can be overwritten at runtime either through Ecrion Omni System or programmatically. |
You can now proceed with configuring your other workflow steps, but do make sure to select Update to ensure your changes are committed. If you finished configuring the Job, select the Save button in order to save all the settings for the Job.