|
Creating a New Stylesheet |


|
|
Creating a New Stylesheet |
|
You can use the Publisher to visually create your own Stylesheet without having to manually write CSS code. To do so, follow the instructions provided below.
Saving the Stylesheet File
Quick Access
1. In the Ribbon, select the bottom part of the Manage Styles button located in the Home Tab.
2. From the contextual menu, select Create New Stylesheet.

Figure 1: The "Create new Stylesheet" option is highlighted in the contextual menu.
3. The Windows Open Dialog will be displayed, and you need to navigate to where you would like to save the new file. You must, as well, give the file a name.
4. Select the Manager Styles button in the Ribbon and from the Styles Pane use the down arrow to navigate to the newly added Stylesheet.
Styles Pane
1. In the Ribbon, select the Manage Styles button located in the Home Tab. The Styles Pane will now be displayed.
2. Select the Options button to reveal more options and select Create New Stylesheet.
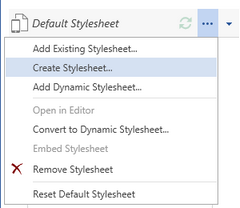
Figure 2: The "Create new stylesheet" option is selected in the Styles Pane.
3. You will need to specify the location where the new stylesheet will be saved. Use the Windows Open Dialog to browse and give your new stylesheet a name.
Creating Styles
1. Select Add New Style to create a Style.
2. Next, the New Style Dialog is displayed.
a. Select what type of elements this style can be applied to. Use the drop down menu to select the style type. Select Other from the list to chooses a more specific element type if needed.
b. Provide an appropriate Style Name for this new style. If a Name is not given, the style will be applied to all instances of the selected element.
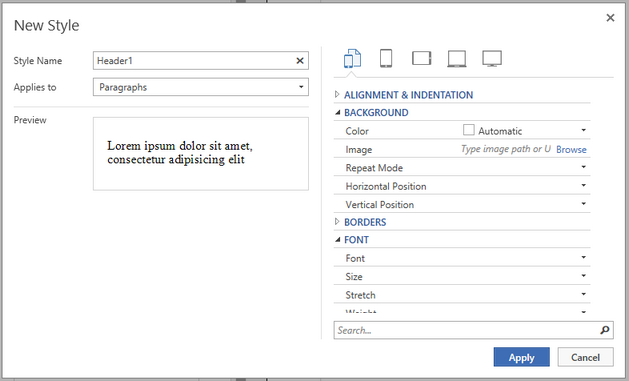
Figure 3: The New Style Dialog allows to set up a new Style.
3. Using the formatting options begin modifying the properties that will change when you apply this style. In this example, we will change the font size when this style is applied. Notice in Figure 4 that the selection of the Font Size property is highlighted. You will notice that the preview image will modify to show you what the application of your style will look like.
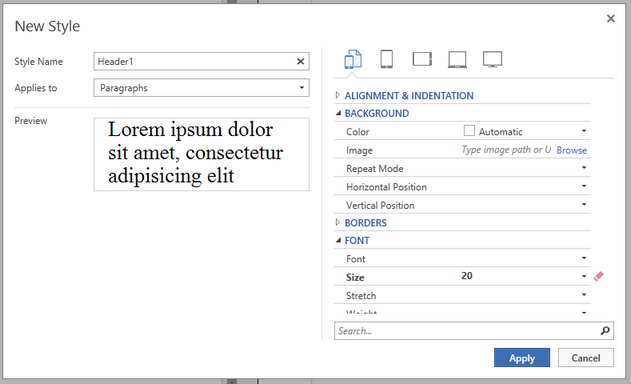
Figure 4: The Properties Dialog is used to select the Property to apply with this Style.
4. When you are finished with your selection, select Apply.
5. You should now repeat steps 1- 4 to add all of the styles you require.
6. You will now be returned to the Styles Pane. Your newly created style is now listed and you can apply this style to your content using any of the methods listed in the Applying Your Styles to Content section. In addition, you can repeat steps 3 through 5 above to create another style for your stylesheet. Lastly, you will now notice that your created styles are also available in the Home Tab of the Ribbon for single click application.