|
Creating a New Static Page Set |


|
A Static Page Set is a Page Set that is not dependent upon the data source for repeating or conditional display but will always be present in your output. To create a Static Page Set, follow the instructions provided below.
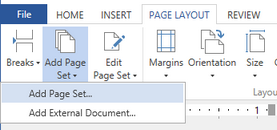
1. In the Page Layout Tab of the Ribbon, select the Add Page Set button. From these options provided, choose Add Page Set.

Figure 1: The Add Page Set option is selected in the Ribbon.
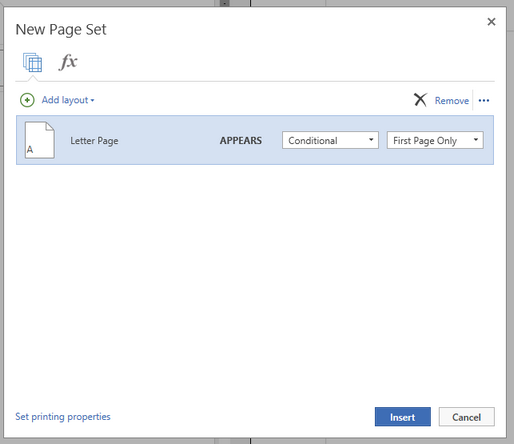
2. The New Page Set Dialog will now be displayed. First, you will need to specify which layout(s) will be applied to this page set and exactly how they will be applied. You can select Add Layout to combine multiple layout applications to a single Page Set. You can learn more about working with multiple layouts in the How to Apply Multiple Layouts section.
3. You have options to move the layout up or down in application order with the up and down buttons found in the Options Menu. In addition, you can remove the layout application for this Page Set.
4. Next configure the occurrence. This tells the Publisher how you would like this layout applied to you page set. For example, by selecting Conditional, you can specify this layout to only be applied to the first page.

Figure 2: A useful Dialog allows setup of layout application.
5. Continue selecting and modifying your layout applications for all available layouts, and select Insert when this is complete. You will need to ensure that all possible pages are accounted for logically, otherwise you will receive a notification from the Publisher that not all pages are accounted for.
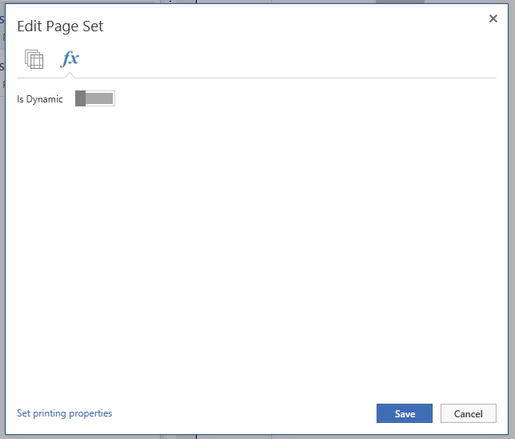
6. In the Page Set Dialog, you can toggle the option to make this a Dynamic Page Set on or off. For a Static Page Set, leave this option off. You can learn more about this option by visiting the Creating a New Dynamic Page Set section.

Figure 3 The Dynamic Page Set option is used to turn dynamic properties for the page set on or off.
7. Lastly, you can configure different printing options for your Page Set as needed. All of these values can be added as static content by manually typing in the boxes provided, or you can select the arrow to the right of any of the fields to set this dynamically from your data source.
8. Select Save when complete. You will now be returned to the Design Surface where you will notice you can scroll to access your newly added page set.
9. Next, access the Pagination Pane by selecting Pagination from the View Tab.
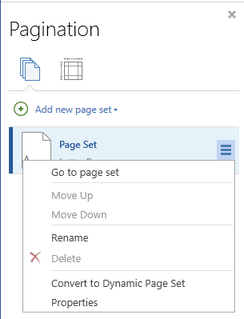
10. Here you will notice your new Page Set is presented. Select the Page Set and select the Options Menu to the right of your selection to reveal options.

Figure 4: The Pagination Pane allows quick access to options related to Page Sets.
11. You should rename your Page Set to something relevant related to the content that it possesses. Select Rename from this available menu.