|
XML Output |


|
|
XML Output |
|
If you have chosen to create XML Output through your Data Diagram design, it is important to understand the different operations that are available to you in designing the output data source. In this section, you can find information on setting up your XML Output to meet your output needs.
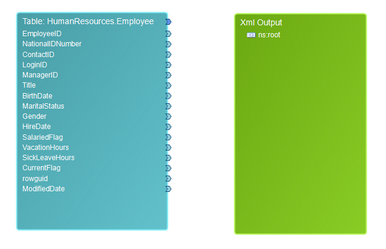
Figure 1: The XML output diagram object as seen in the Design Surface.
Structuring Output XML
You can always create attributes and element sequences by mapping a data connection to the output XML. However, this section describes how to structure your XML output data in ways such as adding attributes, elements, and more to you output XML.
By default, the element ns:root will be displayed in the Output XML as every XML must have a root element. You can rename this, change or remove namespace, and more by double clicking on this element to access the Properties Dialog. You can access the properties dialog for any element, element sequence, or attribute in your output XML in the same manner.
By right clicking on the root element, you will notice the Application Bar appear at the bottom of the screen. Here we can add the pieces that will provide the structure to our data and they are each highlighted below.
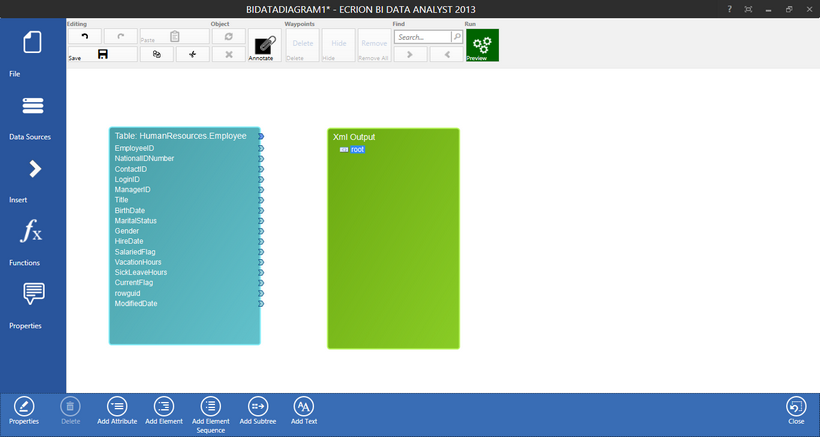
Figure 2: The Application Bar provides options related to elements and attributes in the XML output.
| • | Add Attribute - An attribute is an XML data object which describes an element. If you create an element for cars, you may wish to add attributes that will describe each car, such as, color, make, and model. When we select this option, an attribute will be added directly to the element that is selected in the Design Surface. |
| • | Add Element - An element is an information unit in an XML file. This includes its start and end tags, and any child elements contained within (including attributes). If we needed to create an element for an object in our data source, we would select this option to create an element. An element will show up in the output XML as a child of the element selected in the Design Surface. |
| • | Add Element Sequence - An element sequence is the dynamic creation of elements based upon each record in an input data set. For example, if you have one hundred cars in a car dealership, you may wish to create an element sequence for "cars". This would generate an element for every car which can possess its own describing attribute values. |
| • | Add Subtree - A subtree can be used to add data source content residing in an input source but preserving the child elements and attributes as they are found in the input source. This will include the entire subtree in your output XML source without having to map every element and every attribute accordingly. This can be very beneficial for saving time, but it should be noted that if this XML is used for template design purposes, the child elements and associated attributes will not be accessible to the designer. |
| • | Add Text - An element can contain text content stored as string type. You can add a text value to any element by using this option. |
A Useful Example
The following example highlights the available options. These are the steps used to create this structure.
- An element sequence is created and named "employees".
- An element is created called "ID-Information".
- An element is created called "Personal-Information".
- An attribute is added to "ID-Information" called "employee-id".
- An attribute is added to "ID-Information" called "contact-id".
- An attribute is added to "Personal-Information" called "gender".
- A text value is added to the "Personal-Information" element.
Now that the structure is set up, we can begin to map our data according to our needs by connecting input and output data set and value connectors.
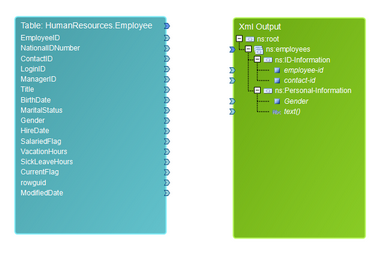
Figure 3: The XML structure is created by using the Application Bar.
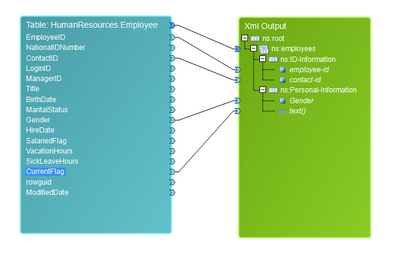
Figure 4: Data Connections are created to map data to the XML output.
The results of this diagram should reveal an element created for each employee, and within each employee element there will be two child elements (ID-Information and Personal-Information). The ID-Information element will contain two ID attributes, and the Personal-Information will contain an attribute for gender and a text value for their current employment flag.

Figure 5: The output preview reveals that the data is designed appropriately.