|
Use Functions |


|
In this example, the use of functions will be illustrated through a simple example: Concatenate.
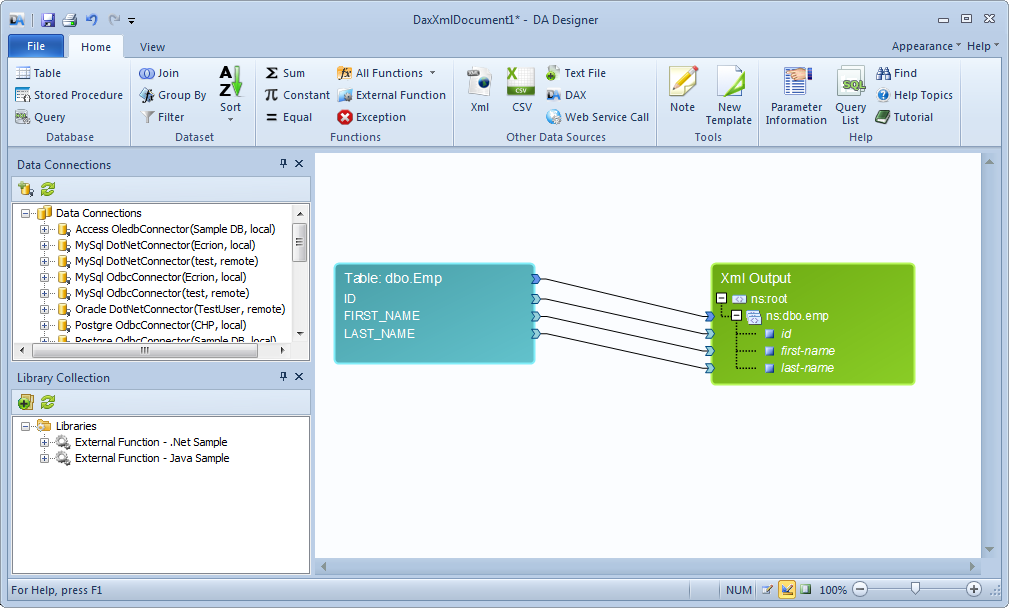
The document created in our previous tutorial, Creating a Simple Diagram, will be used for exemplifying the function.

Step 1: Inserting the desired function
The full name of each employee will be added o the output XML. This field is not defined in the input table, so the FIRST_NAME and LAST_NAME fields must be concatenated, in order to obtain the full name.
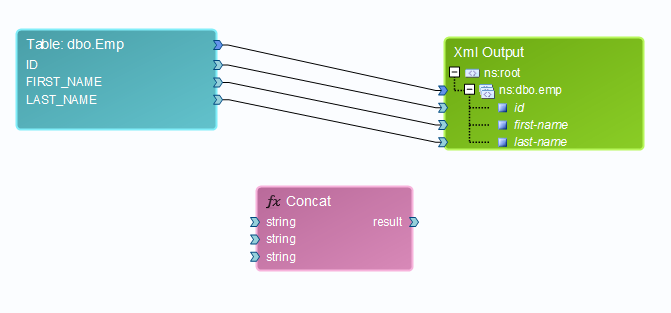
The Concatenate function will be used for creating the new string. To insert the function, firstly the All Functions button, located in the Functions group, under the Home tab, must be selected. Afterwards, from the drop-down list, the Concatenate option, located under the String section must be selected. As a result, the diagram element corresponding to the mentioned function will be inserted. The element contains, by default, two input parameters and the result output parameter, that returns the concatenated string.
Step 2: Editing the parameters
The result must be of the following form: "<LAST_NAME>, <FIRST_NAME>". As a result, three input parameters will be needed:
| • | FIRST_NAME |
| • | ", " |
| • | LAST_NAME |
However, the function only accepts two parameters, so an additional parameter must be added by right clicking on the corresponding diagram element and selecting the Add Parameter option. A name can be chosen for the parameter, must it has no relevance in the process of concatenating the input strings.
Note:
| • | A parameter can always be renamed by right-clicking on its displayed name and selecting the Edit Parameter option. |
The result must be the following:

Step 3: Binding the data
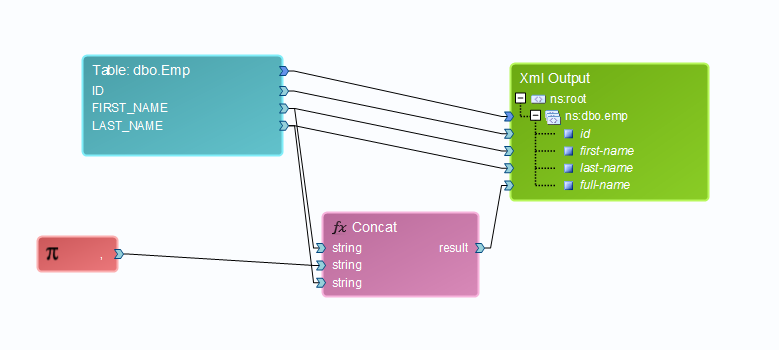
The Concatenate function's first and last input parameters must be bound to the LAST_NAME and FIRST_NAME fields, by dragging the mouse from the arrow next to the fields onto the parameters.
To add the ", " string constant, a Constant function with the desired text must be inserted by selecting the Constant button located in the Functions group, under the Home tab. To edit its value, the user must double click on the corresponding diagram element, select the "string" option for the Value Type field and type in ", " (a comma and a space) as Value.
Next, the output connector of the Constant must be connected to the Concatenate function's second input parameter.
Then, the result of the Concatenate function must be bound to the ns:dbo.emp element, and a new attribute named attribute-name will be created in the output schema. To edit its name, the user must double click on it and introduce the desired value (for example, "full-name").
The final diagram must look as follows:

Step 4: Viewing the output
To view the output, the user must access the View tab and select Output View, or press CTRL + Page Down while in Design View. The following XML will be displayed:
<?xml version="1.0" encoding="UTF-8" standalone="yes"?>
<ns:root xmlns:ns="http://www.tempuri.org/XML">
<ns:dbo.emp id="1" first-name="John" last-name="Brown" full-name="John, Brown"/>
<ns:dbo.emp id="2" first-name="Mary" last-name="Jane" full-name="Mary, Jane"/>
<ns:dbo.emp id="3" first-name="Arthur" last-name="Clark" full-name="Arthur, Clark"/>
</ns:root>
Note:
| • | The above example is part of the ConcatenateSample.dax document, located in the Samples/Job Samples folder. |